

Ok, so who's ready for a room makeover reveal? Like, a biiiig room makeover reveal! Because that's what you're in for today. I've been working up to this post for a looong time, and although there are other changes that will probably be made to this room, I think it's finally to a point where I can put my perfectionist tendencies aside and share the end product. Given this is the main room of the house, and it actually doubles as two rooms, I guess I can understand why it's taken me so long to write this, and why this post is going to be so long. If you're still here by the end of this post, God bless you!
Since I already know this is going to be lengthy, let's just jump right in with some Before pictures.


And with the furniture cleared out...

So, as you can see, we were working with a lot of dark paneled wood. For those of you who lived through the '70's, please tell me, what was going through your heads when you thought lining your walls and ceilings with dark and dingy paneling was a good idea?! I'm sure in 20 years my kids will be asking me the same question, but about Ikat wallpaper or something that then will seem equally as offensive. But I guess this constant evolution of trends is what keeps interior decorators in business!
Like many projects with this house, we seemed to go through several rounds of renovations.
Round 1: Thinking we can do it the cheap way, only to decide afterwards that the room still isn't ideal and looks like a cheap renovation.
Round 2: Call in the experts and step aside
Here's what Round 1 looked like.


Better, but at the end of the day, it was still a bit dark and dingy. The low ceilings felt like they were coming down on you, and given the entire wall of windows and skylights, the room didn't feel as if it had great natural light pouring in. However, before we jump to the next step, I would be remiss if I didn't mention how long it actually took to get to this point. For those of you who have painted paneling before, you know what I'm talking about. We're talking priming, painting, using a brush to get into the cracks. It's not fun and it's not fast. I knew this, but to my benefit I had a couple friends who weren't aware of how taxing this project would be, and I somehow managed to recruit them to spend a weekend helping me. How they still consider me a friend after that, I don't know, but Stacey and Lindsay, I'm well aware I still owe you a weekend of your life back!
And once they discovered that not only a couple months later our family room looked like this, I'm sure there were beyond fuming, and I don't blame them! This is what we would call the beginning of Round 2. See ya later paneling. It's been real, but it's time for you to go.

By this point, we had installed new flooring and decided there were just too many challenges that we were facing by having to work around the paneling. We finally surrendered and gave the go ahead to rip up the walls and ceiling. This decision gave us much more flexibility regarding light fixture placement, room layout, decor decisions and also allowed so much more natural light into the room.
Here is the overall scope of work:
- Replace flooring
- Elevate ceiling
- Drywall ceiling and walls
- Replace pantry doors
- Replace and paint window trim
- Build fireplace frame
- Remove entryway overhangs
- Update electrical
- Install baseboards, chair rail and crown molding
- Install wallpaper
- Install backup HVAC system
- Paint walls, trim, doors
And onto the end result...


All right, you ready to talk about all the details? Let's do it! We'll start from the bottom up.
I've talked about this flooring several times before, as we've used it for a good portion of our main level. I probably sound like a broken record, but I'll continue to tell you how much I love it. We originally chose it because it was budget friendly, but it's also proved to be good looking, great at hiding dirt that the pups drag in, and versatile. It is actually ceramic tile, but has the appearance of wood. We went with a herringbone layout for the great room and kitchen.

Onto the walls. Well, obviously, they are no longer paneled, but rather dry walled. Or more specifically, wallpapered. I definitely went through (actually am still going through) a major wallpaper phase. I. CAN'T. GET. ENOUGH. In general, the smaller the room, the bolder the print. Bathrooms and hallways are fair game to loud and ostentatious prints, but when it comes to larger rooms where you spend more time, I try to tone it back a bit.

I went with a subtle and classic grasscloth design by Phillip Jeffries for this space. It's just enough texture and color to add interest, but not overpower the room.

While it may be subtle in design, it wasn't subtle on the checkbook! I learned wallpaper can prove to be a pricey upgrade. Luckily, I figured out a workaround to this issue. Once again, my subpar math skills seemed to work in my favor. Whatever method I used to measure the walls resulted in only 1/3 of the actual amount needed. Well, by the time you already have 1/3 of the wallpaper hung, you have no choice but to buy the remaining amount to finish off the room. Yeah, that's a dirty little trick I may have to use again. ;)

Besides the wallpaper, the obvious focal point of the walls is the fireplace. Believe it or not, but it's the original fireplace, we just added a border and mantle around it. You can read all about the details here.

As I mentioned in my original post about the fireplace, trying to light a fire would be ill advised; calling a chimney sweep is still on our to-do list. However, on those cold, bitter nights, I try and pretend like that candelabra is a close substitute to a warm, crackling fire.

Working our way up, I have to say we hit one of the biggest improvements of the room. Prior to ripping out the paneling, there was a low overhang separating the family room from the back windows, and more importantly, the skylights. When the overhang was there, all of the natural light from the skylights would get blocked, but once we ripped out this overhang...there was light, and lots of it!

I wish I could share a better picture of this view, but mixing my subpar photography skills with trying to take a picture into direct sunlight doesn't really jive. However, in real life, this view is my favorite. It overlooks our backyard which is surrounded by woods. It's plush and green in the summer, and as the colors start to change in the fall, it's absolutely breathtaking. I'll admit, it's not the prettiest at the moment, as we're in the middle of winter, but regardless of the season, it's always entertaining to look outside and watch Lucy and Emmy running around and playing. It's a reminder as to why we bought this house in the first place.


Although I can sit back and look at this room now and think the layout is perfect, it wasn't an easy process to get here. Although it's a large room, the off-centered fireplace and pantry doors really threw me off as to how we should arrange the furniture and what the main function of the room should be.

If I could give one piece of advice regarding home renovations, it would be to take it slow. I know everyone doesn't always have that option, but because this is our second home, we were able to really think about the process every step of the way. I can't tell you how many evenings, and how many bottles of wine, it took for us to finally decide on the function of this room. We would literally spend our Friday nights sitting on a couple lawn chairs in the center of this room, drinking wine from Solo cups, debating the future of this space. For a long while, we thought this room would function as an oversized dining room with a huge table running the length of the room. Although this setup would be great for the couple times a year we entertain large groups of people for holidays, it didn't seem practical for everyday living.

In the end, we decided to split up the room into a living area and a dining area. The flow works out perfectly, as you can still converse with people in the kitchen, ultimately, making the entire space feel like one large area.

But don't even get me started on the kitchen...that's a whole other beast!

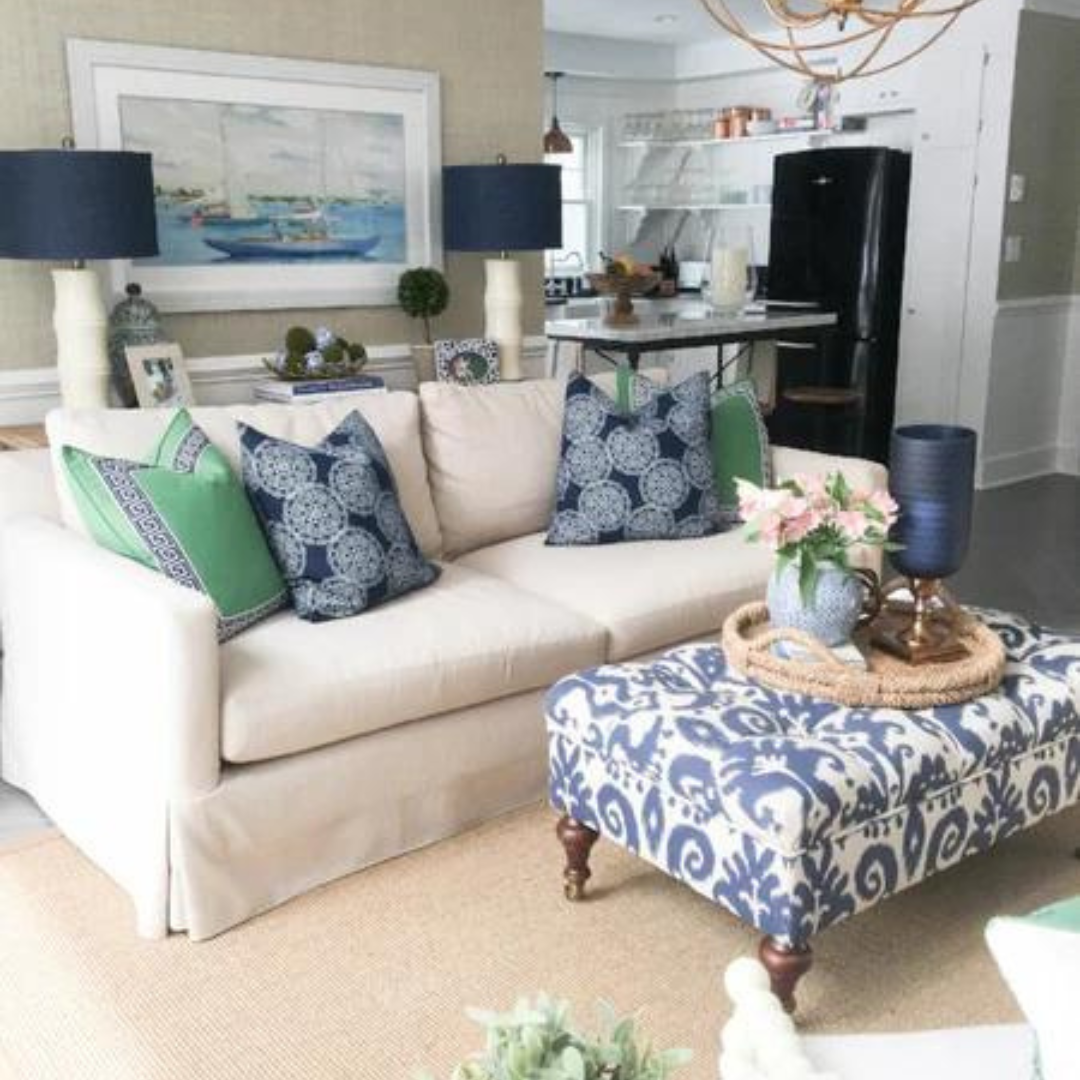
Given that we decided to split this room into two functions, it creates a cozy atmosphere. But by designing the space with a symmetrical layout and choosing smaller scale furniture, we were able to achieve this dual function goal without the space feeling cramped or over-crowded.

Similar to other rooms of the house, this room is a mixture of new, old and everything in between. While the sofa, bobbin chairs and ottoman are all new (mainly because we were working with size constraints and had to find specific furniture to scale), we also brought in custom pieces.
This green buffet is one of my pieces that I refinished.

And our dining table was custom built by a friend of mine.

Besides that, I put my own personal touch on the room by adding in lots of blue and white decor...

touches of green, which I used as my accent color...

and custom throw pillows which I purchased from various Etsy shops.

In the end, this room is now bright, cheerful and happy! A far cry from how it started.

